Markforged Metal X 3D Printer


The Metal X Includes:
• Metal X 3D Printer, Sinter-1, Wash-1, Printer Cabinet
• 1kg 17-4 Stainless Steel Filament
• Metal X Build Plate
• 3 x Metal Quick-change nozzles
![]()
![]()
![]()
A Breakthrough in Metal 3D Printing
From Markforged, the company that revolutionized 3D printing with composite carbon fiber, comes
a leap in additive metal manufacturing. The Metal X greatly accelerates innovation,
delivering metal parts overnight using a new technology at a fraction of the cost. Leave
20th century manufacturing in the dust and create anything from industrial replacement
parts to injection molds to working prototypes.
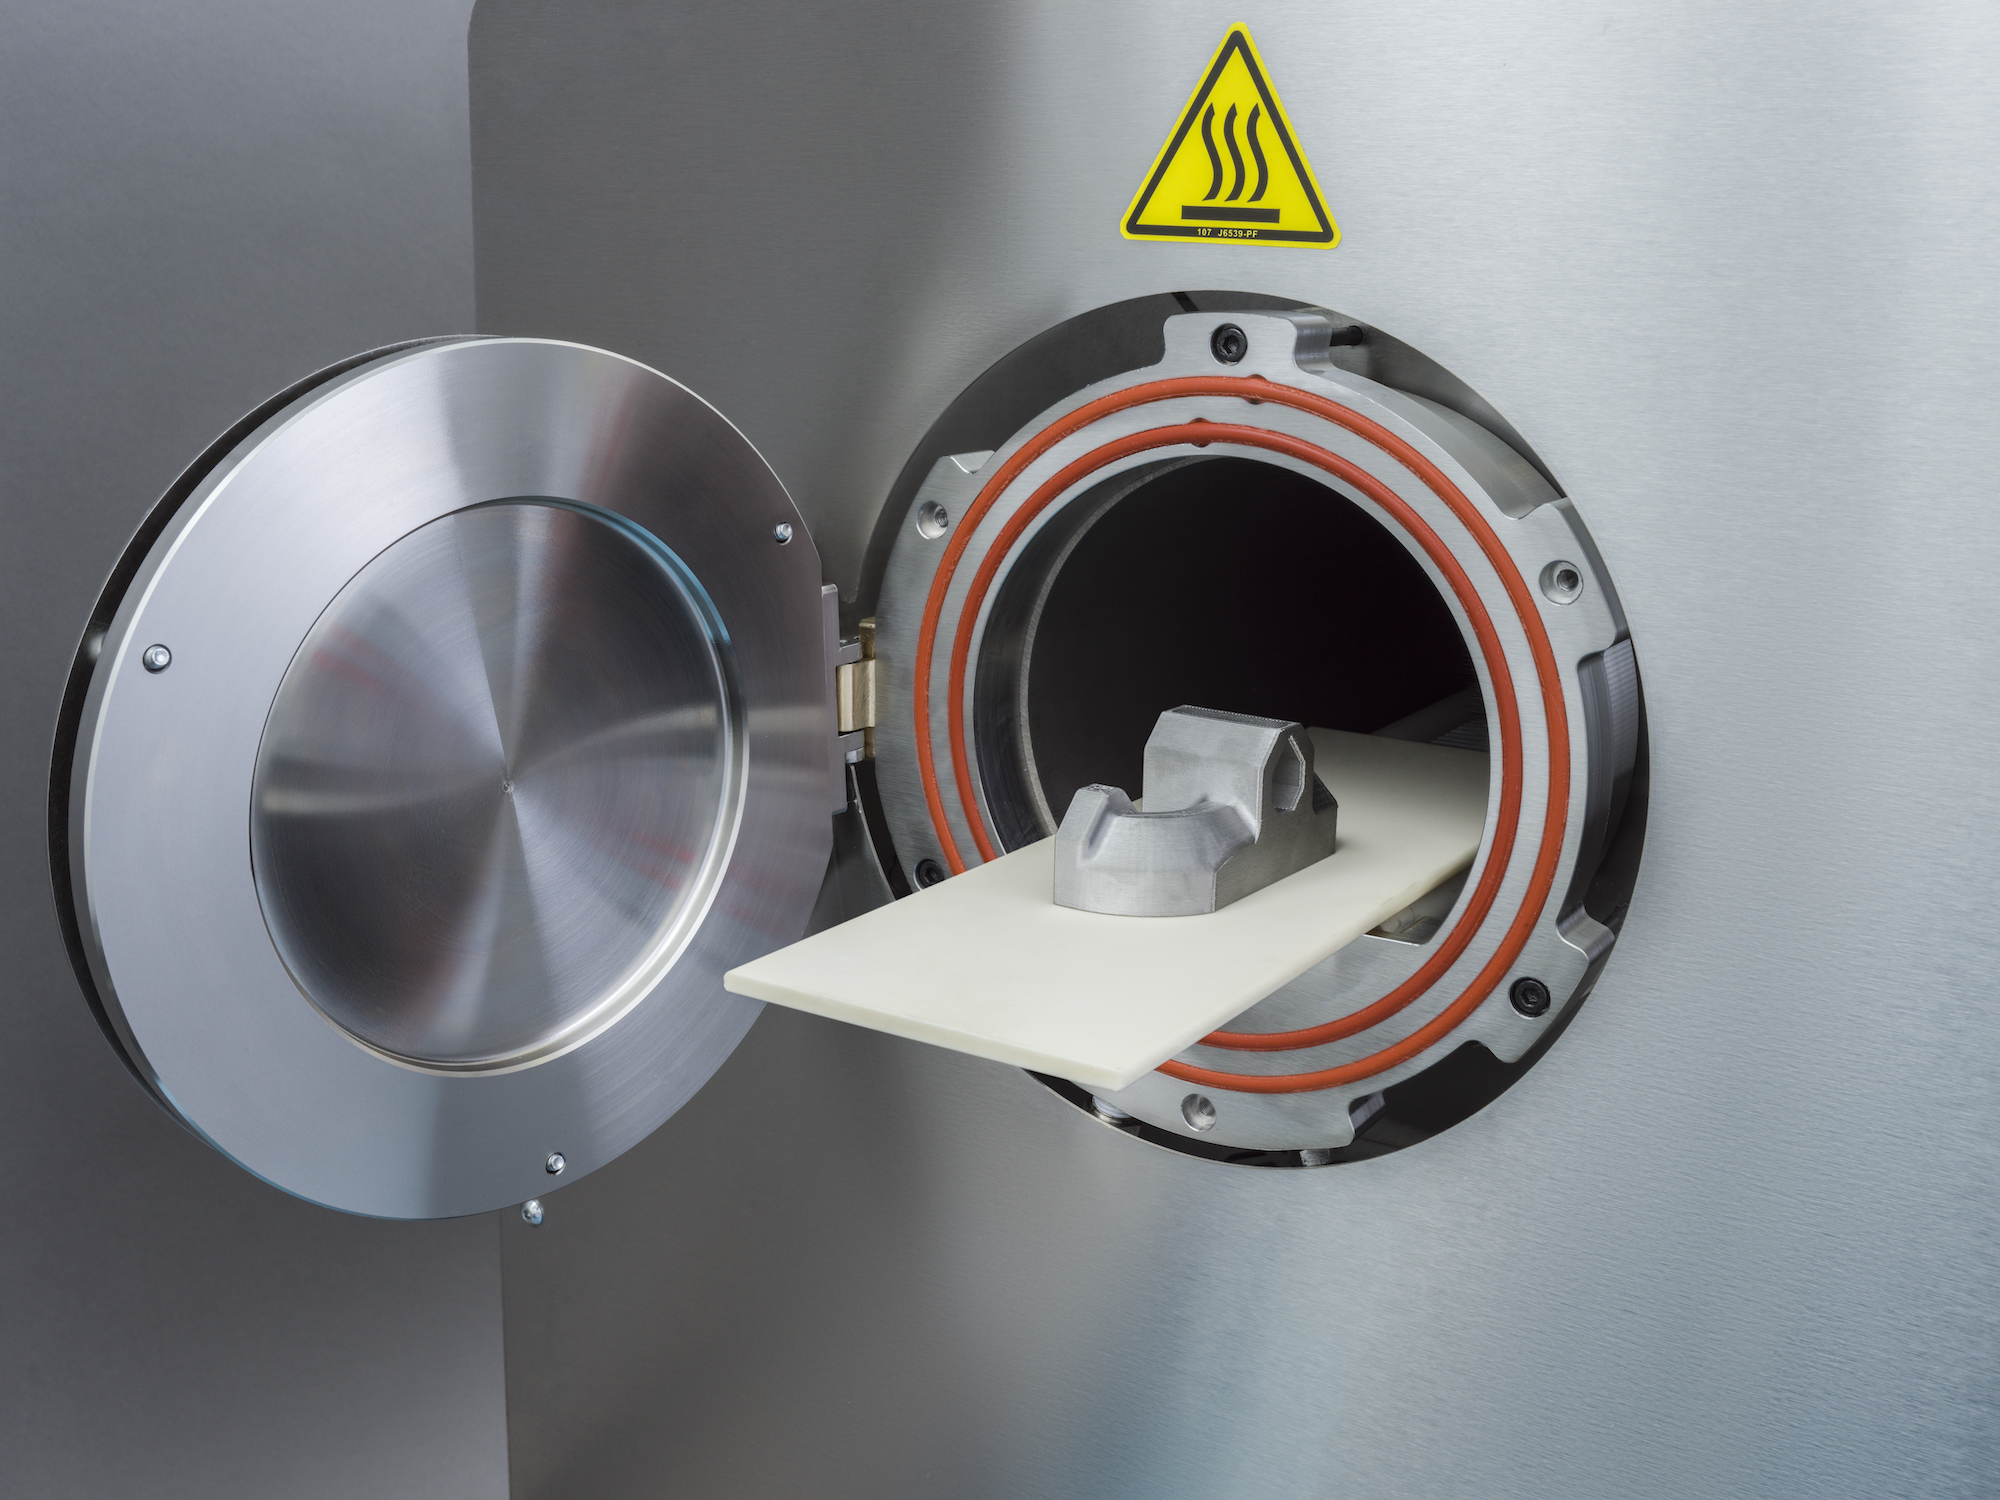
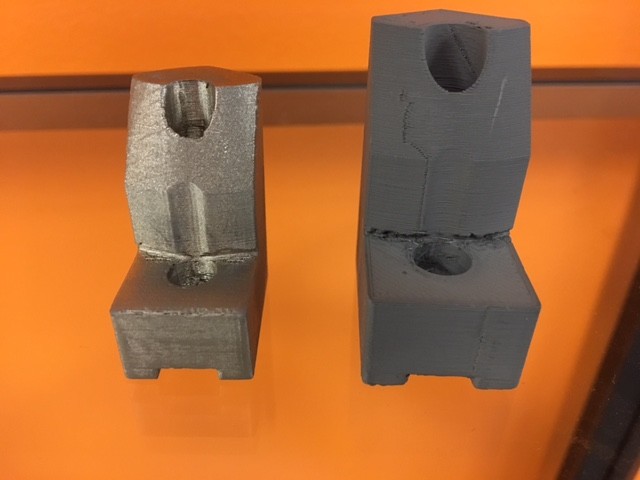
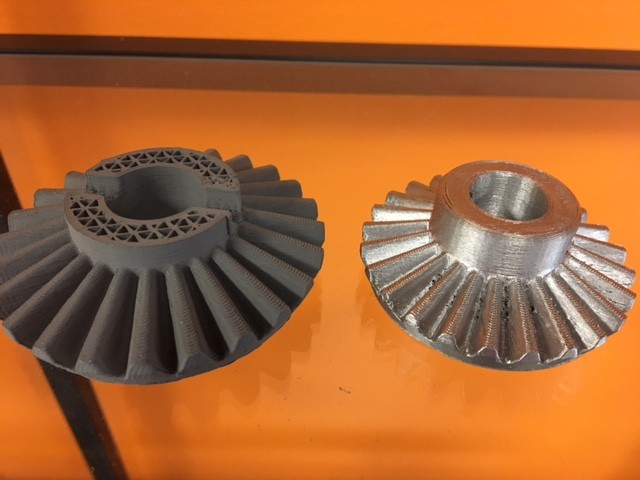
ADAM – Atomic diffusion additive manufacturing
The intersection of 3D printing and metal injection molding, ADAM is an all new
way to build metal parts.
DESIGN – CAD your part, upload the STL, and select from a wide range of metals. Eiger
software does the rest making printing the right part easy.
GREEN PART – Just like metal injection molding, as-printed parts are “green” and scaled
up to account for shrinkage during sintering. In this state the part can be easily polished by hand.
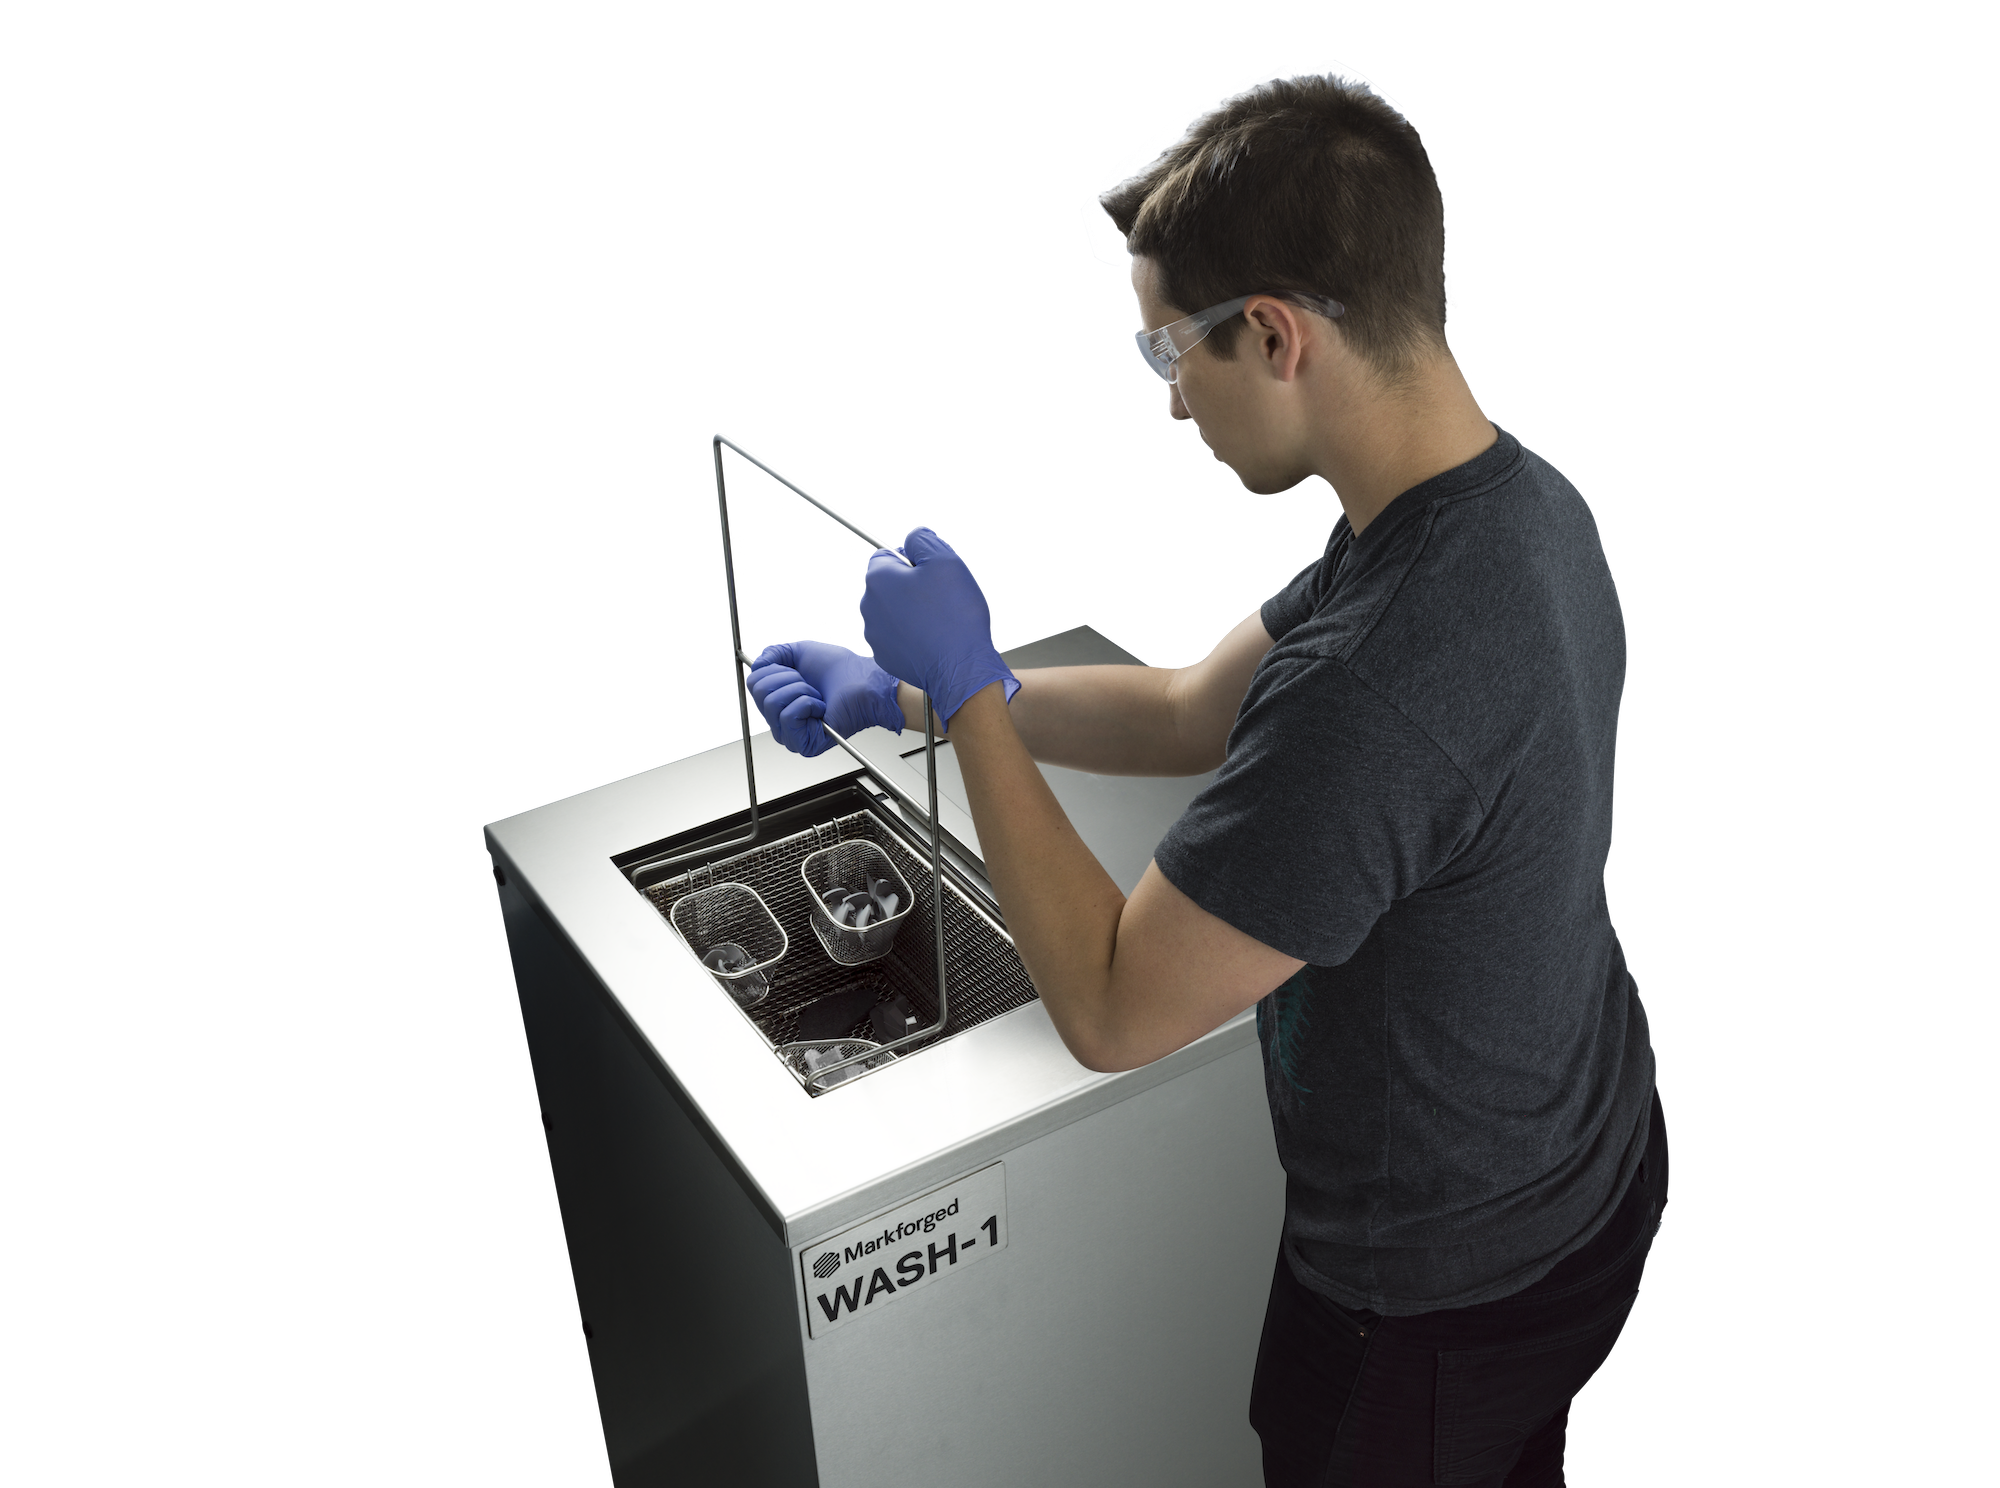
SINTER – Green Parts go through a washing stage to remove some of the binder. They are then
sintered in a furnace and the metal powder fuses into solid metal.
FINAL PART – Pure metal and up to 99.7% dense, the final parts are ready for use. They can be
processed and treated just like any other metal parts.
| PRINTING | |
| Printing Technology: | Fused Filament Fabrication |
| Material Compatibility: | Stainless Steel 17-4, 316L Aluminum 6061,7075 (beta) Inconel IN Alloy 625 (beta) Tool Steel A-2, D-2 (beta) Titanium Ti-6Al-4V (beta) |
| Build Size(xyz): | 9.84 x 8.66 x 7.87 Inches (250 x 220 x 200mm) |
| Extruder: | Quick Change |
| Accuracy: | 50 Micron (.002″ xy) 100 Micron (.004″ z) |
| Layer Resolution: | 50 Micron |
| Laser Scanning Res | 50 Micron |
| Laser Accuracy | 1 Micron |
| MECHANICAL | |
| Printer Dim (L x W x H): | 22.6 x 18.4 x 56.37 Inches (575 x 467 x 1432 mm) |
| Chassis: | Anodized Aluminum Unibody |
| Build Platform: | Kinematically Coupled |
| Draft Blocking Enclosure: | Yes |
| Printer Weight: | |
| Printer Shipping Weight/Dim: | |
| SOFTWARE | |
| Software: | Cloud Enabled |
| Supported OS: | Mac OS 10.7 Lion +, Win 7+, Linux* |
| Supported Browser: | Chrome 30+ |
| Supported Files: | .STL |
| Connectivity: | WiFi, Ethernet, USB Drive |
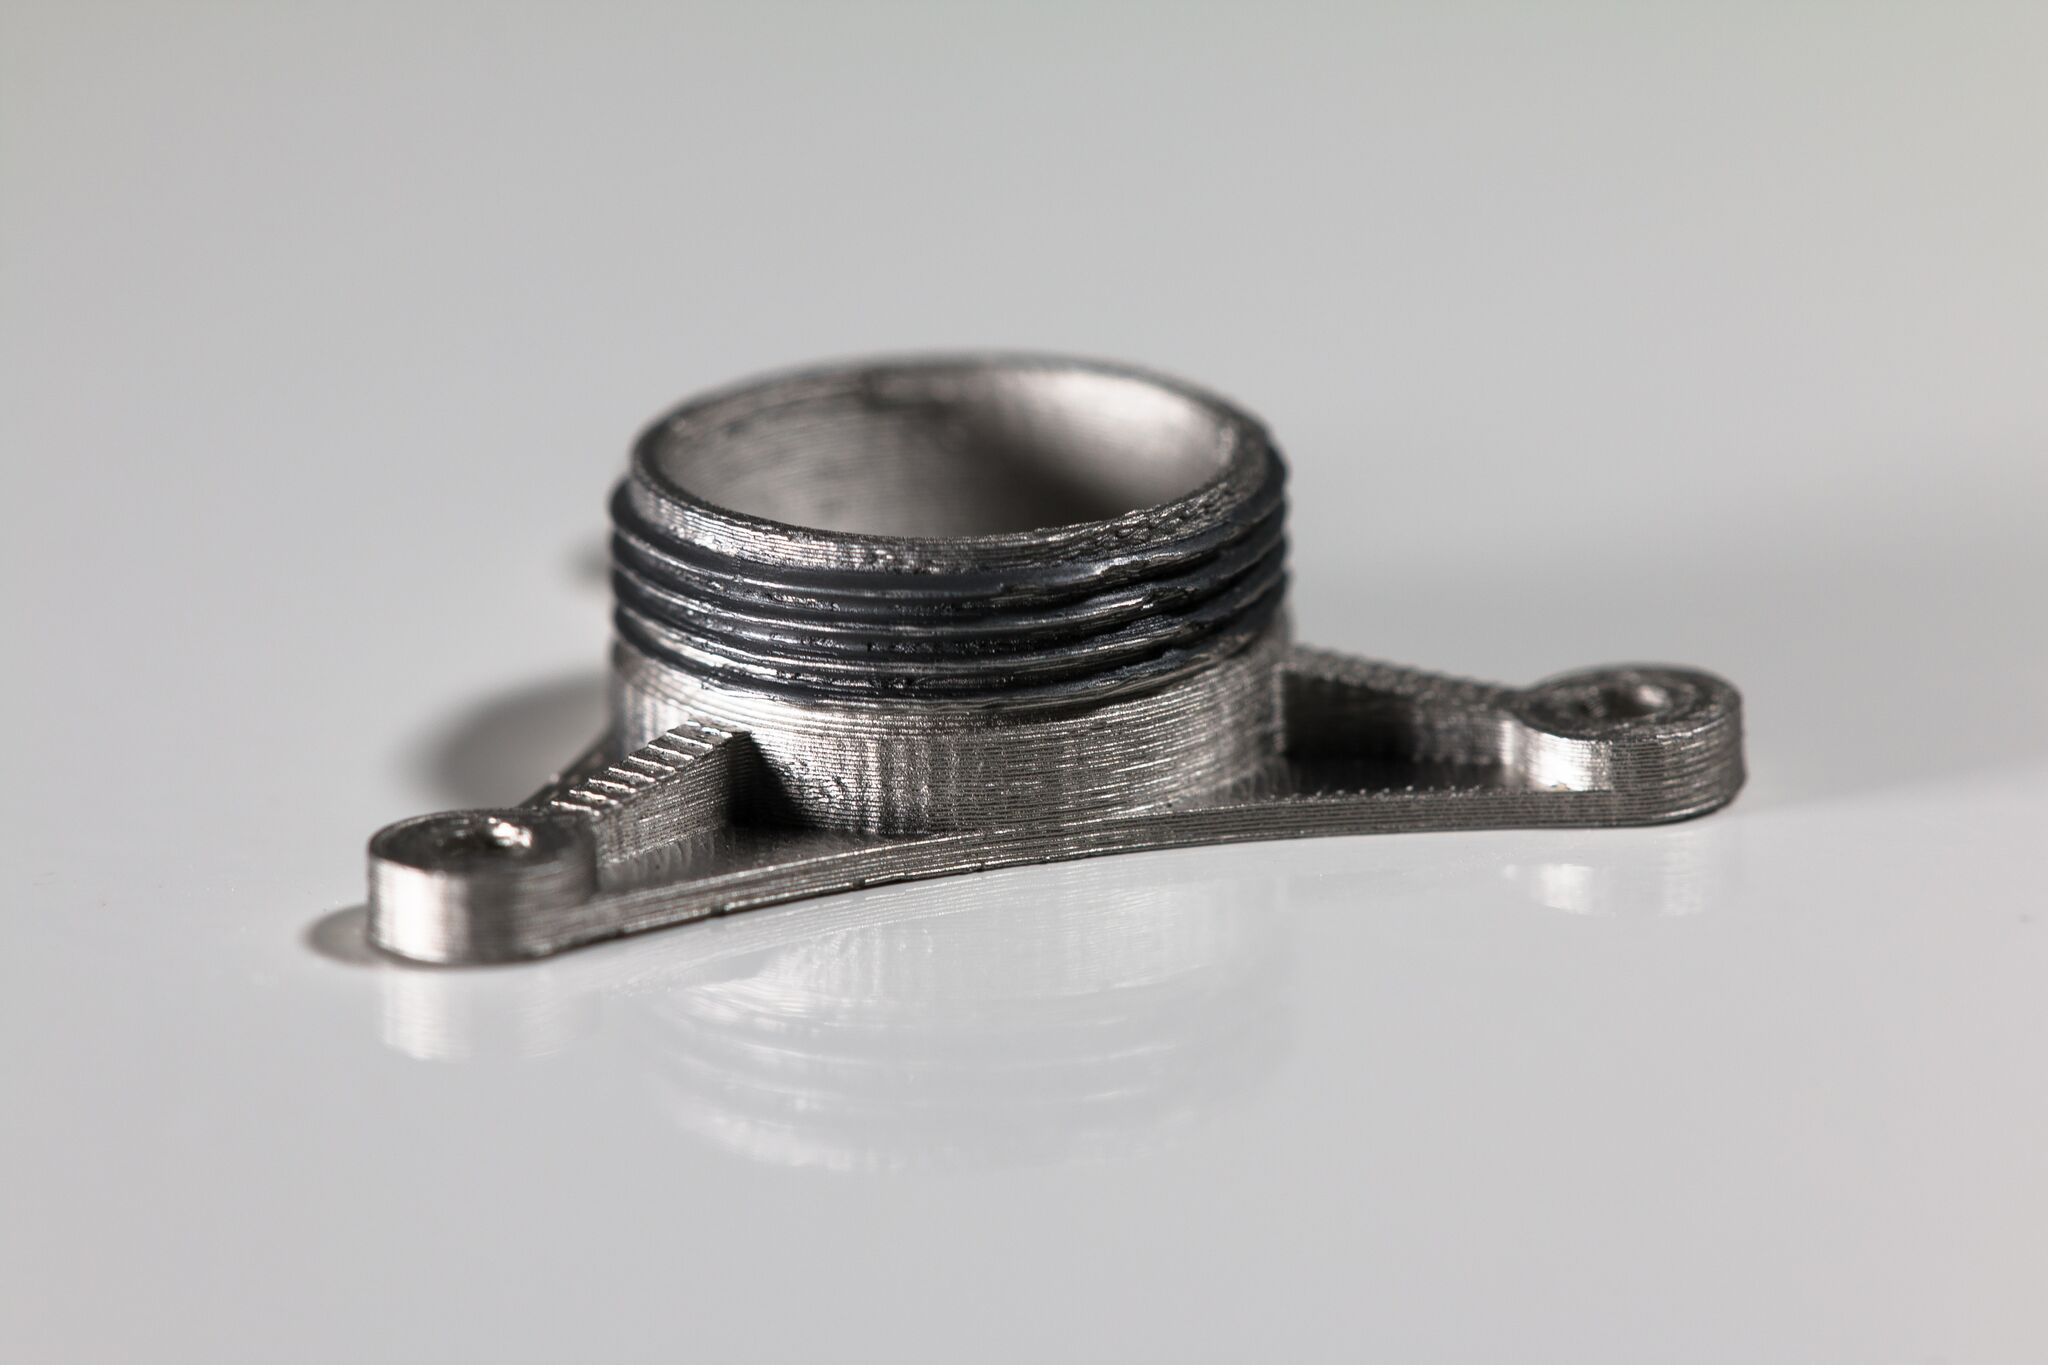
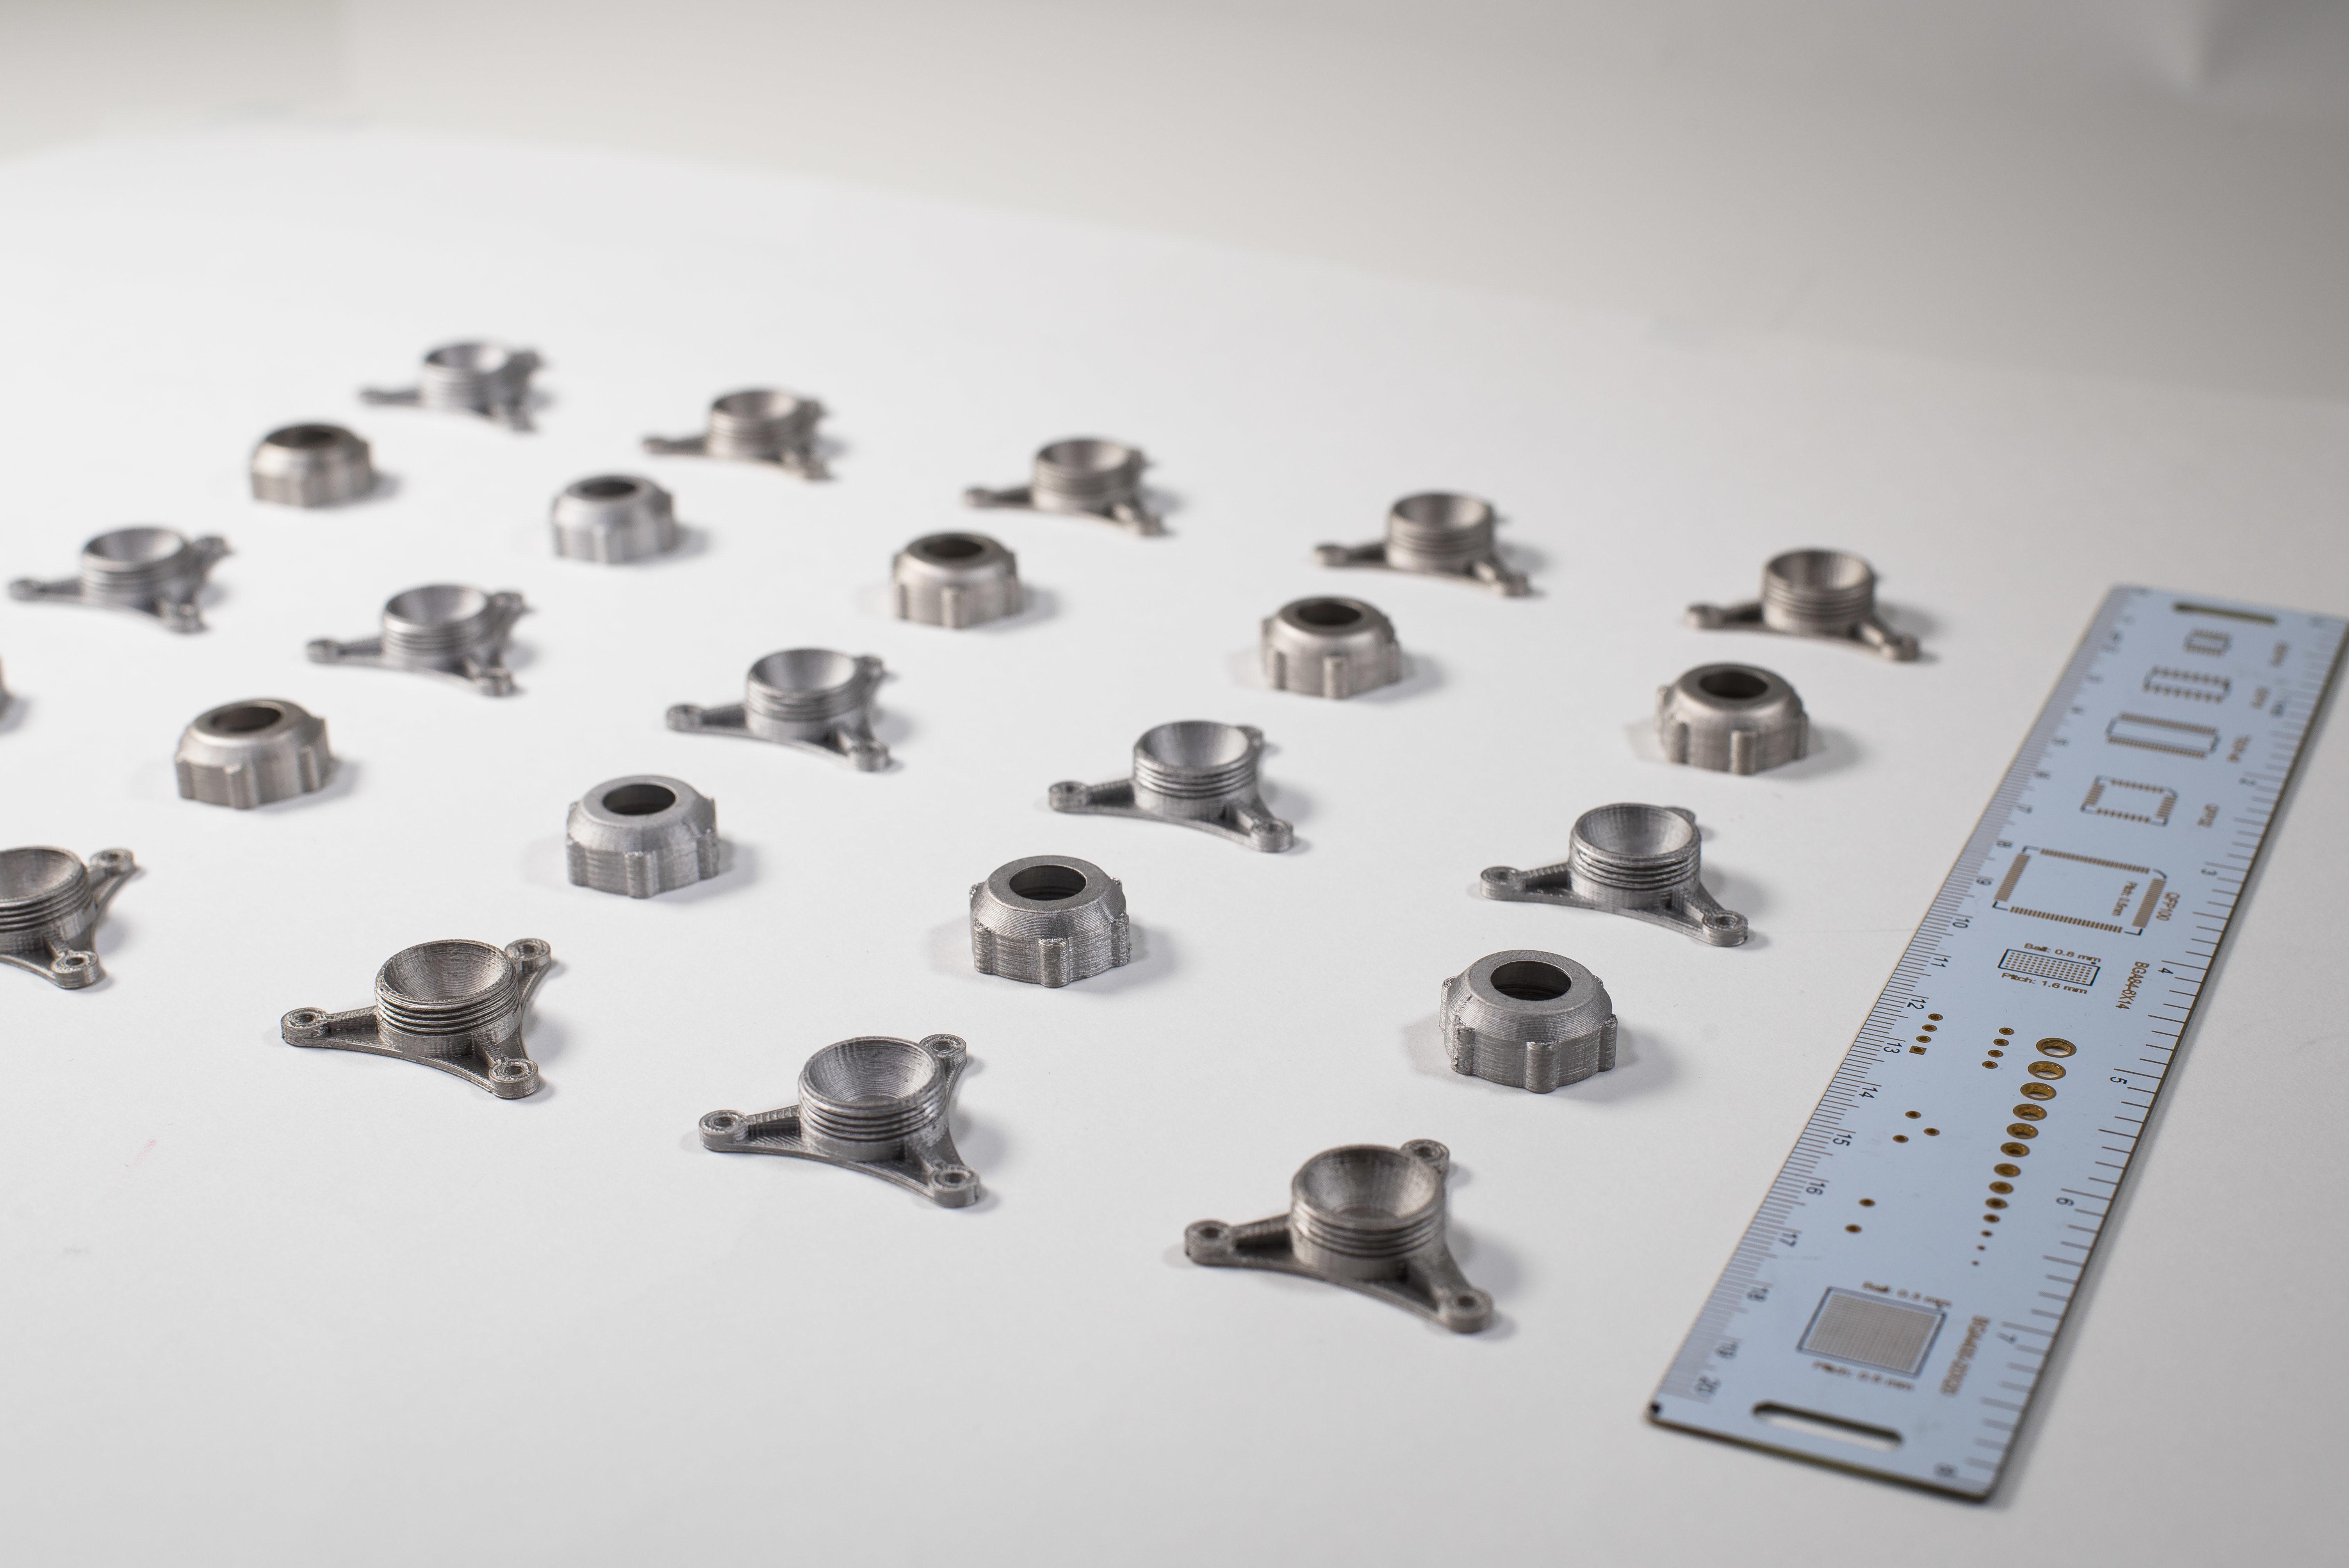
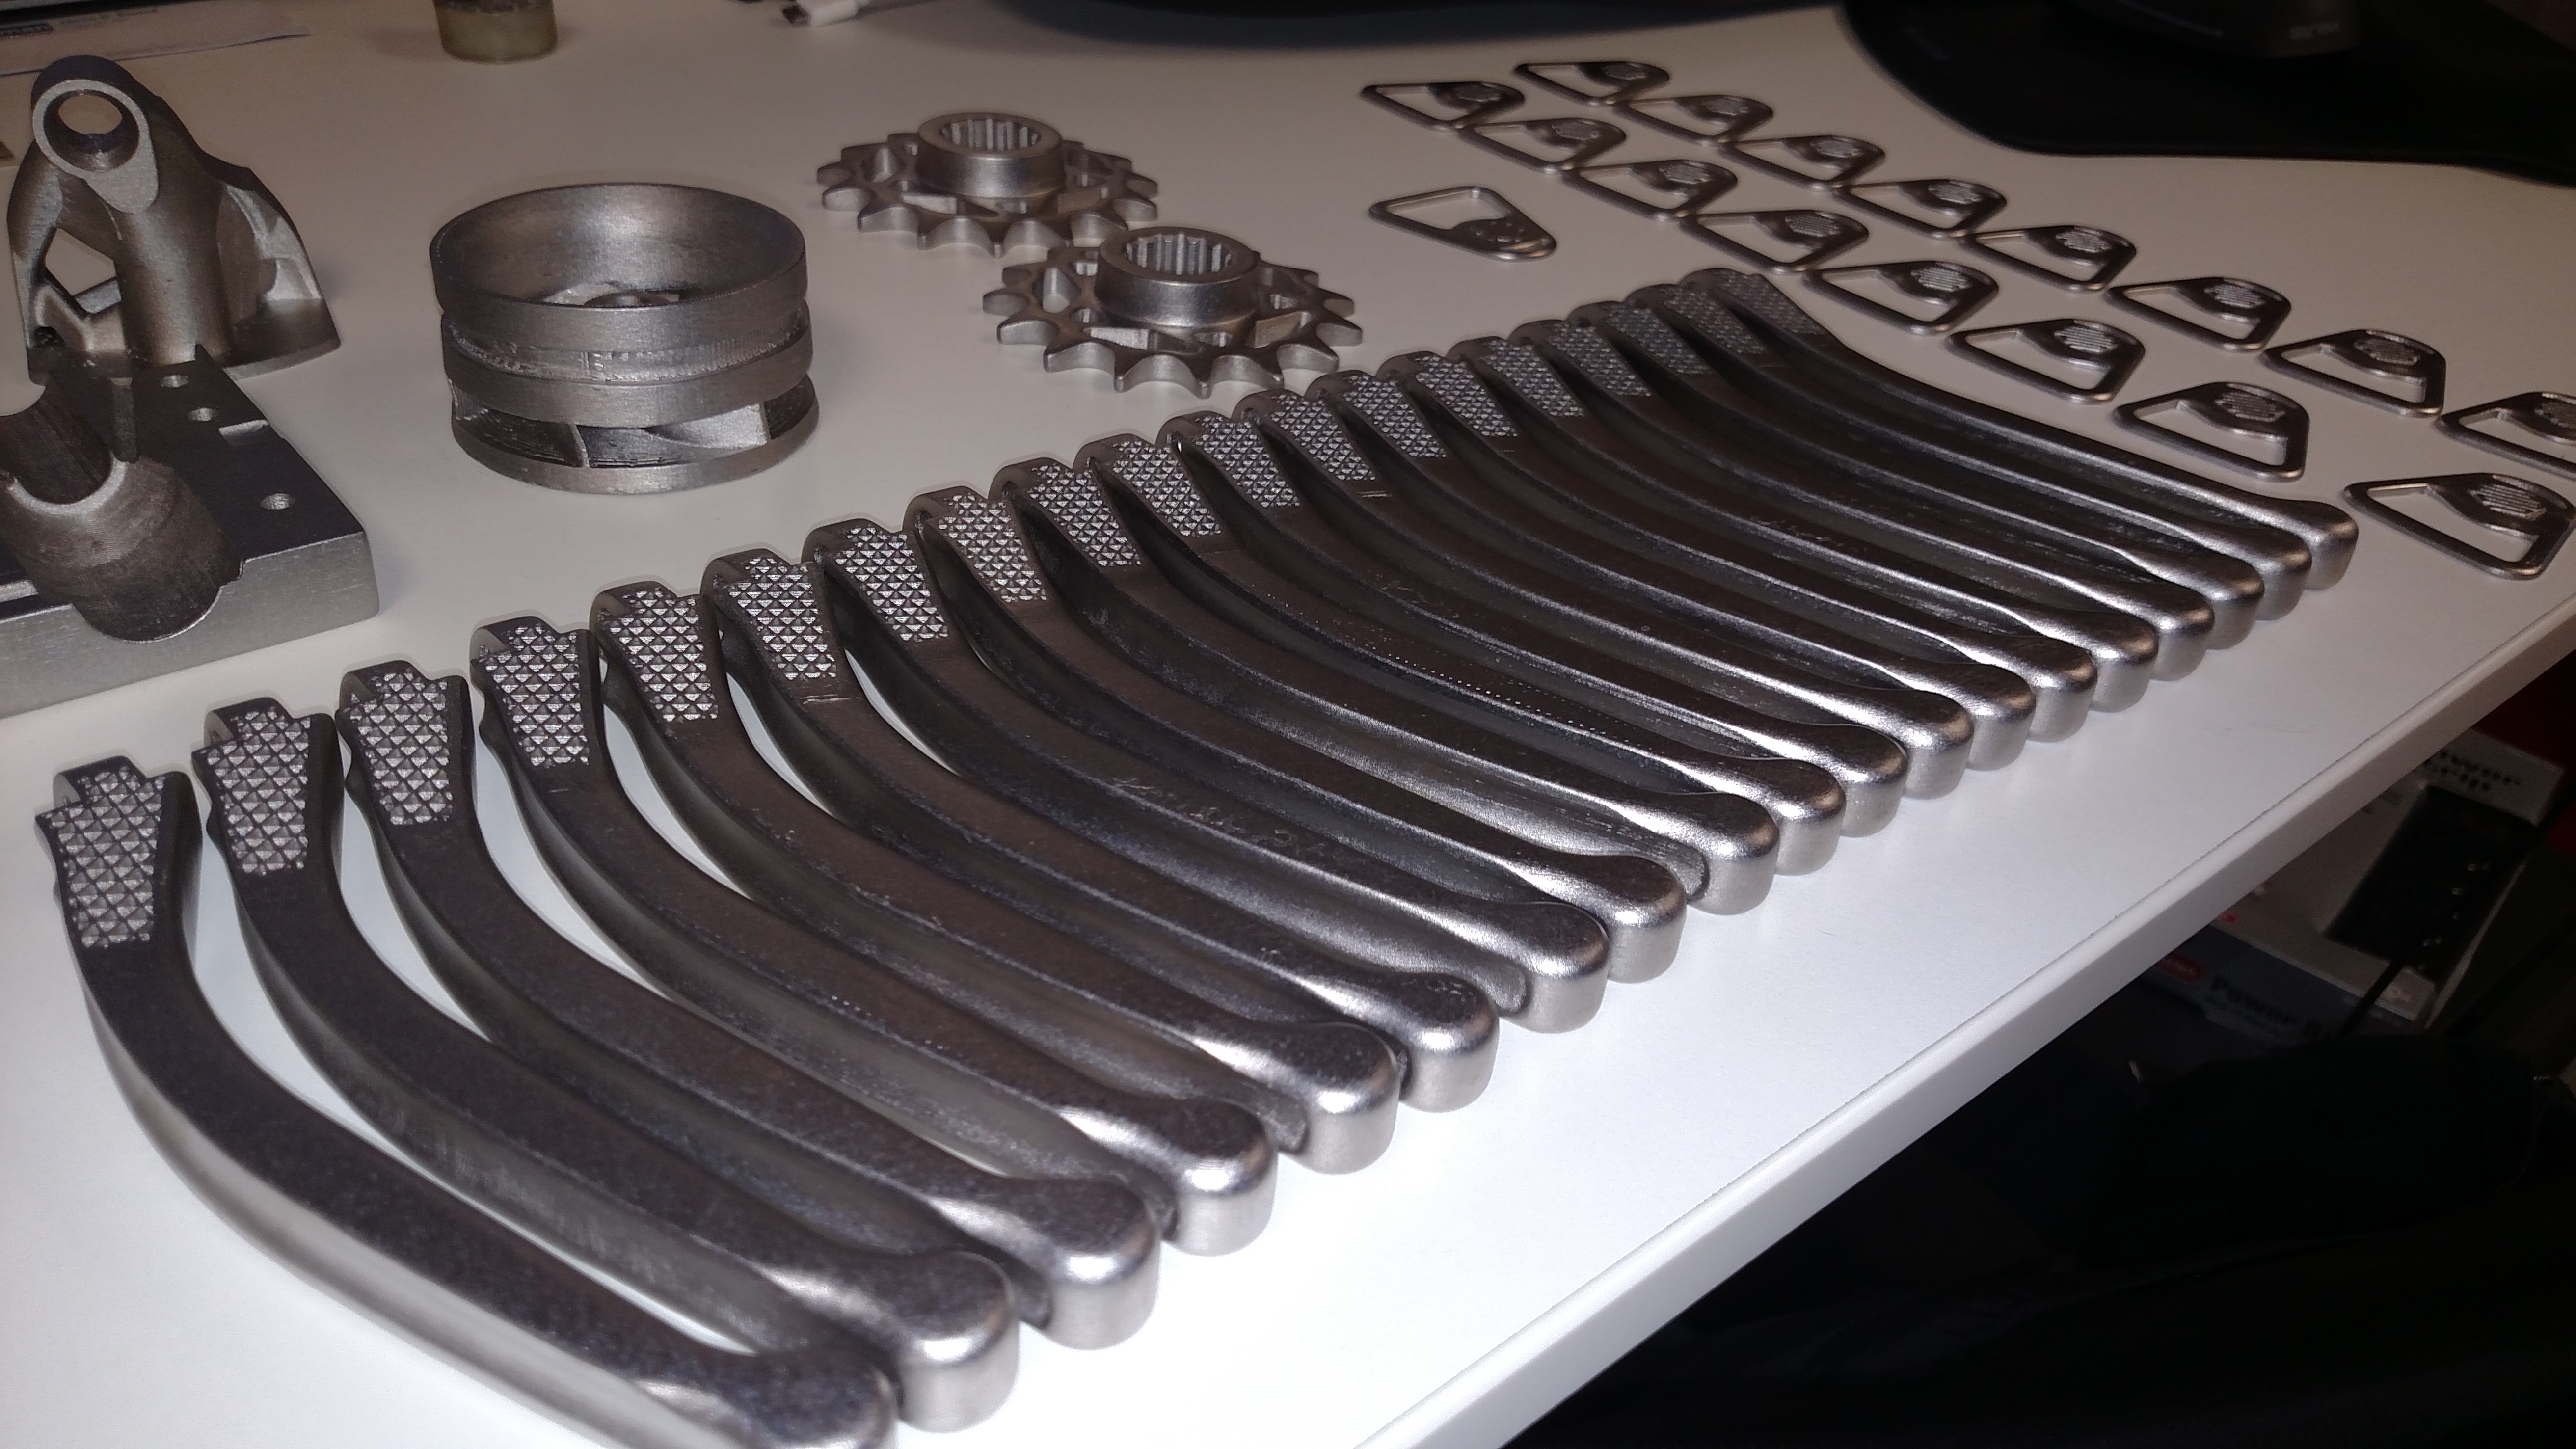
STAINLESS STEEL 17-4 & 316L
17-4 stainless steel combines high strength, corrosion resistance, and hardness, making it widely used in aerospace, medical and petroleum industries. We use it for assembly fixtures and tooling on the Mark X.
Also know as marine grade stainless steel, 316L stainless steel exhibits very good corrosion resistance and excellent weldability.
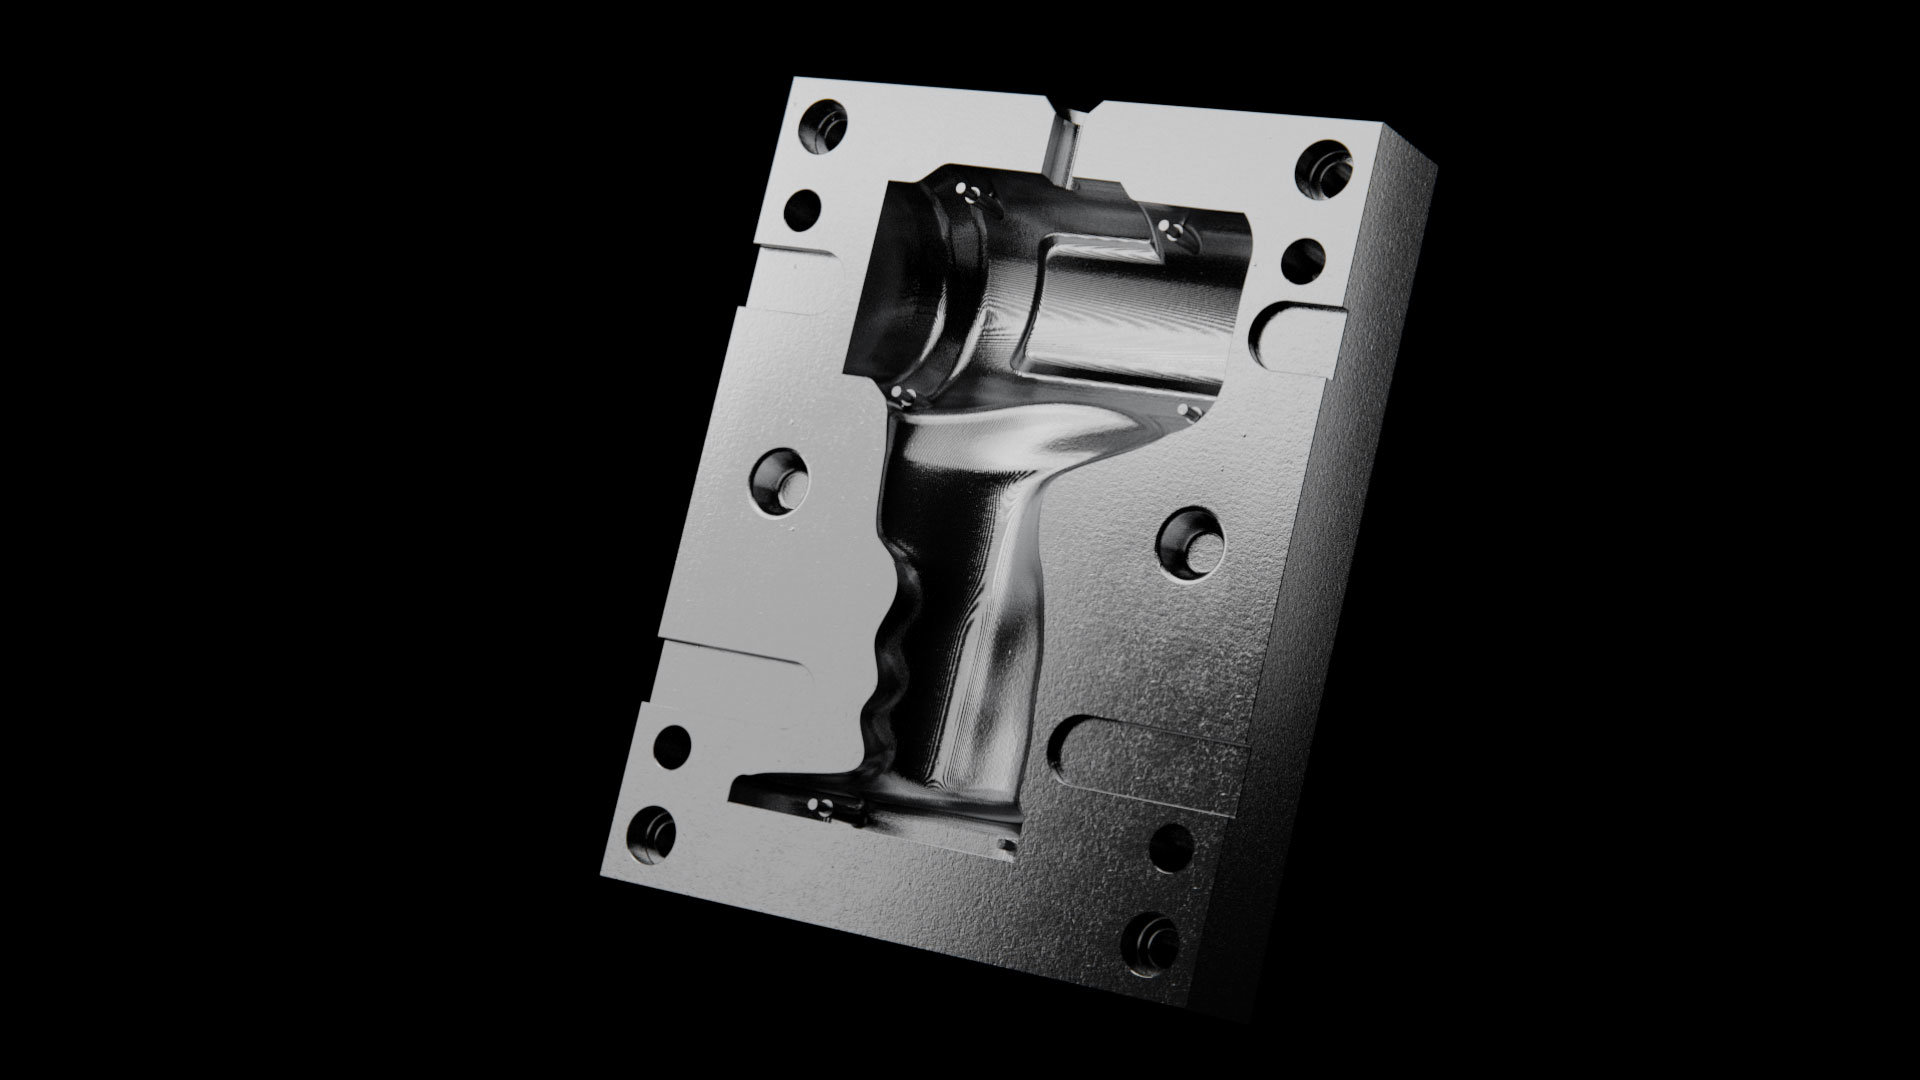
TOOL STEEL A-2 & D-2 (Beta)
A-2 tool steel is air-hardened with excellent impact resistance. We use it for punches, dies, and form tooling on the Mark X.
The high carbon and chromium content of D-2 tool steel provides great hardness and abrasion resistance (but not as tough as A-2). D-2 is often used for cutting tools.


| Cost | Time | |
| Printed on Markforged | $54.70 | 52 hours |
| Machined from Aluminum | $1,090.41 | 3-5 days + shipping |
| By the end of one Competition Weekend, the printer has paid for itself. | ||
 Blades spinning, blasts of fire, swinging weapons: this is the world of combat robotics. If designers want their robots to have any chance of winning, they have to design their bots to be sturdy enough to take dozens of hits, yet powerful and light enough that their robots can strike fast and hard. Many of these contraptions are built from hardened steel, heavy machined frames, and sharp edges. The designers themselves range from toughened veterans who know their way around the arena to fresh faces eager to send their bots blade-first into battle.
Re-Framing the Problem
His original design for the DDT was laden with a bulky, cumbersome frame: lots of fasteners, stacked plates, and plastic components. “The old chassis was manufactured using several stacks of UHMW Plastic, which were then bolted together with several long screws. This old design was cumbersome because it had so many different fasteners, it was a lot heavier, and because it was solid plastic it was actually very flexible, which isn’t very good for the design,” Go explained. This meant that Go had to dedicate a lot of his bot’s weight just to the unwieldy frame. “The old design did…ok. It definitely won a few matches, but I had to make compromises in lighter components, less powerful components, just because of the weight of the frame…as a result, in its last competition, it was totally destroyed.” Go took the opportunity after a particularly nasty battle to rethink his design: “DDT’s frame was done for and I saw this opportunity to revisit some of the design creeds that I’d been touting for the past year… and so starting with DDT, I will evolve each robot in my fleet”. Upon encountering the Markforged printer, Jamison Go saw an opportunity to use the Markforged to modify the chassis of DDT and make it a single, lightweight part. “This printer is unique because it has the ability to embed continuous strands of fiber within each layer of its print. Although it cannot place fiber in the vertical build axis, this is a monumental improvement in tensile strength… it prints nylon as its base material, which is mechanically superior to ABS in our application.” Go went on to describe how he would use the Markforged in his new design. “To further demonstrate the capabilities and applications of [the Markforged] technology, I have elected to print DDT as a nylon-kevlar unibody.” This would make it lighter and stronger so that he could add in heavier actuators and weapons to get an edge in the ever evolving world of combat robotics.
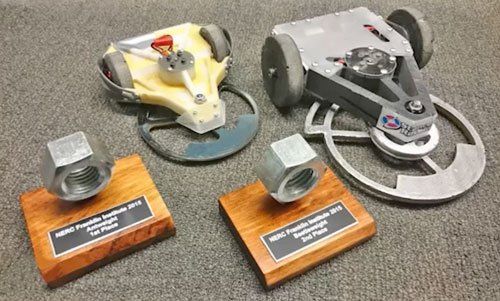
DDT v3 Unibody CAD
Awards won with the DDT
| Cost | Time | |
| Printed on Markforged | $54.70 | 52 hours |
| Machined from Aluminum | $1090.41 | 3-5 days + shipping |
| Pays for itself in 5 prototypes | ||
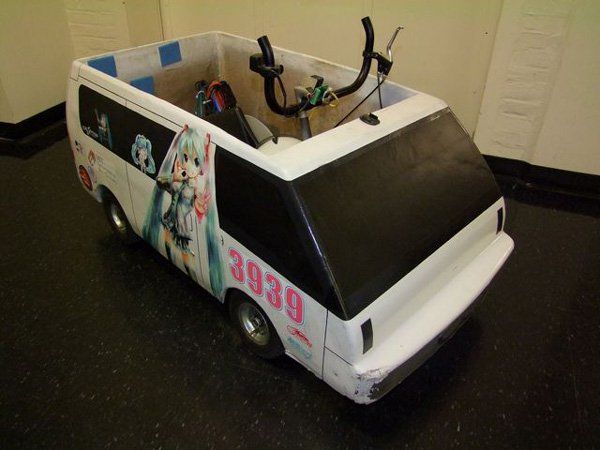
When it comes to reducing weight and simplifying the fabrication process, 3D printing combines the quick, iterative design flow of rapid prototyping with the inexpensive yet complex additive manufacturing process. This allows for intricate, precisely dimensioned parts that would otherwise take hours to toil over in a traditional machine shop. Additive manufacturing provided Guan with an opportunity to vastly reduce the weight and bulk of his steering mechanism, but many 3D printing solutions produce parts that are too weak or too brittle to withstand the forces necessary for a steering knuckle.
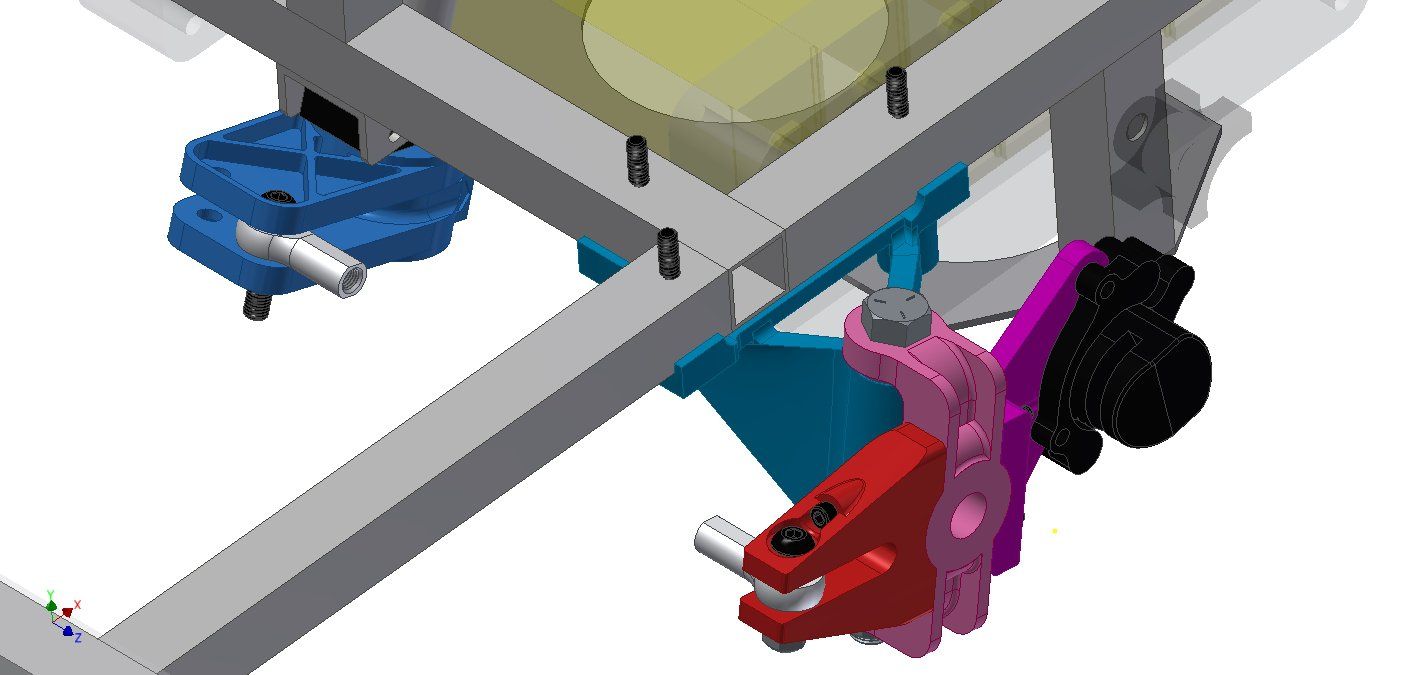
Guan designed the parts to take advantage of the anisotropic nature of the Markforged prints, printing his parts with nylon and fiberglass. The nylon layers provided flexibility, while the embedded fiberglass provided strength about the layers they were laid down upon. “The new steering knuckle,” Guan explains, ”will be printed flat to have large C-shaped sections of fiber holding onto the axle stub”. The knuckle (shown in light pink in the CAD rendering below) has fiber strands running along the face of the “C”, maximizing the strength on that plane, making the part strong, light, and flexible in all the right directions. The knuckle could have been printed in one piece, but it was split into three, using the direction of the fiber in each part to optimize its strength and flexibility. The other two parts, the brake caliper (shown in purple) and the steering follower link (shown in red), were likewise designed to make use of the fiber direction to improve the part. Guan’s new improvements reduced the weight of the bracket’s weight by 40% and made for a more reliable steering assembly.
Printing the parts on the Mark One took about 24 hours. Guan then assembled and tested his new design, jumping on the Chibi-Mikuvan’s frame to make sure it could withstand the forces he needed it to.
SnotBot
Replacement parts, available at the farthest ends of the ocean
| Cost | Time | |
| Printed on Markforged | $34.79 | 19 hours |
| Machined from Aluminum | $661.08 | 3-5 days + shipping |
The Snotbot hurtled down toward the Ocean Alliance research boat, its operator hoping that he could get it back in as few pieces as possible. With the boat moving, the wind blowing, and the drone running low on batteries from carrying so much weight, all landings need to be quick. It’s pilot would be satisfied with any touchdown that at least saved the electronics housing , but that was not a guarantee. Ocean Alliance, a research organization that has studied whale behavior for nearly 50 years, has partnered with Olin College of Engineering, a unique engineering school in Needham, MA, to develop a novel method for collecting biological information from whales. Their solution, the Snotbot, flies over surfaced whales and collects the liquid expelled from their spout. The robot is much less invasive than the traditional tissue collection method, which involves shooting a biopsy arrow at the whale. While using the Snotbot is a much more effective method, landing the drone on a moving boat with rough wind conditions nearly always results in a crash. One of the problems the drone’s designers have to solve is that no landing gear thus far has handled impact reliably.
Devynn Diggins, a mechanical engineer in her junior year at Olin, has accepted the challenge and has worked on the Snotbot for over a year. As part of Olin’s Intelligent Vehicles Lab, Diggins works under Drew Bennett, a professor of robotics and systems, to discover new ways to improve the drone with each prototype. From making the Snotbot resistant to saltwater, to designing landing gear that can handle rough landings, to protecting the blades from rough waves, the pair have faced their fair share of challenges with this drone. Efficient design of the drone is a critical balancing act: a heavier drone will waste more battery life, but a light drone may be too fragile to succeed.
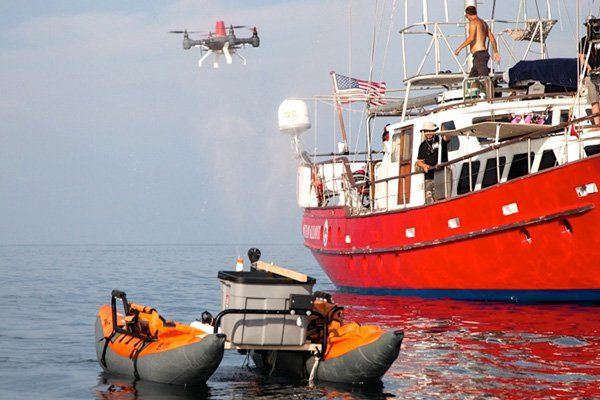 notBot prototype testing at sea
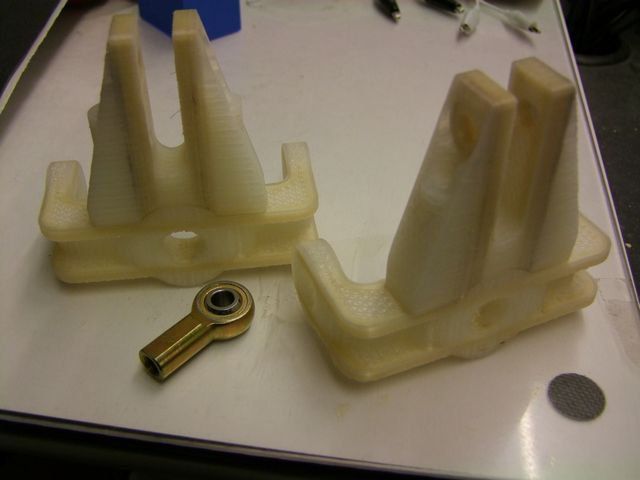
“The original landing gear we had were traditional carbon-composite layups, and they all shattered on landing…,” Bennett explained. “We needed something that had more give, more flexibility, more compliance. But it also had to be really strong.” Traditional carbon fiber layups just weren’t strong enough. The landing gear was just too brittle to handle the impact, even when testing on land, so the team needed a different solution, and they needed it fast. The window of good conditions for whale research was shrinking, and Diggins and Bennett didn’t have the time to wait for another order of spare parts. “Because we were having these problems during testing, we were even more worried about if we were to go over a whale with our vehicle and something went wrong, then the landing gear could snap, preventing us from retrieving the vehicle and possibly harming the whale in the process.” Diggins described. “When we heard about Markforged, we realized that there was a way for us to 3D print new copies of our landing gear based on our existing design, that was just as light but even stronger than what we were currently working with.” The fiber options on the printer provided room to experiment with different designs and materials with a quick turnaround time, as Bennett recounts: “We didn’t know what the right landing gear was, and with the Markforged, we could try different materials, we could try different geometries on the landing gear, we could run out and test them out back…we could make changes to the design, and that allowed Case studypg 3us to create the necessary landing gear fast enough to meet Ocean Alliance’s needs for their operations.” They soon created a lightweight solution with the Markforged printer’s nylon and embedded Kevlar. “The Kevlar gave us the strength we needed for the shape, but at the same time it gave us the flexibility we needed to absorb the force of the impact,” Bennett described.
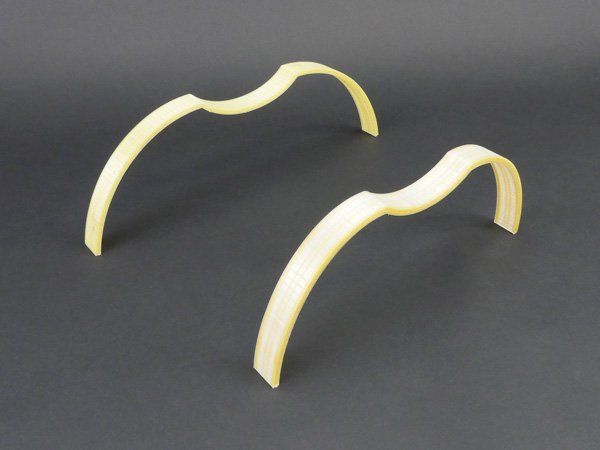 Kevlar reinforced landing struts
Custom Fixtures
 Ready Tomorrow, $20 — $50
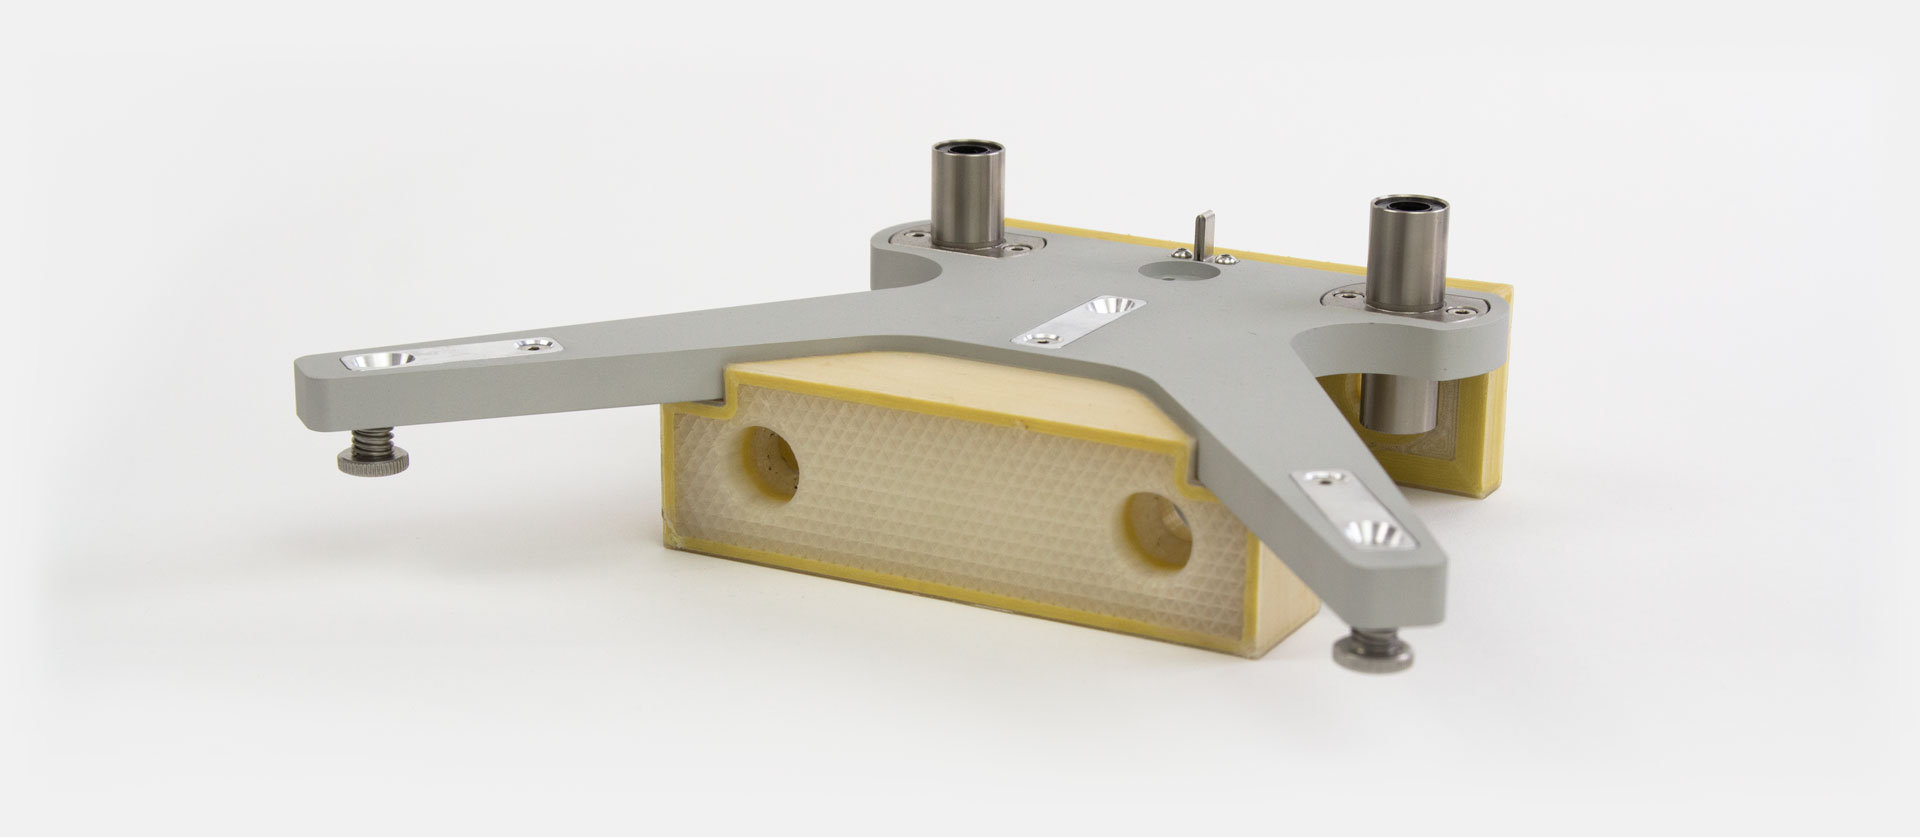
It’s not your first rodeo. You know what you need. You can design the tool in a few hours, and with MarkForged technology, now you can print strong tools and put them to work tomorrow.
Hard Core
with a Smooth Shell
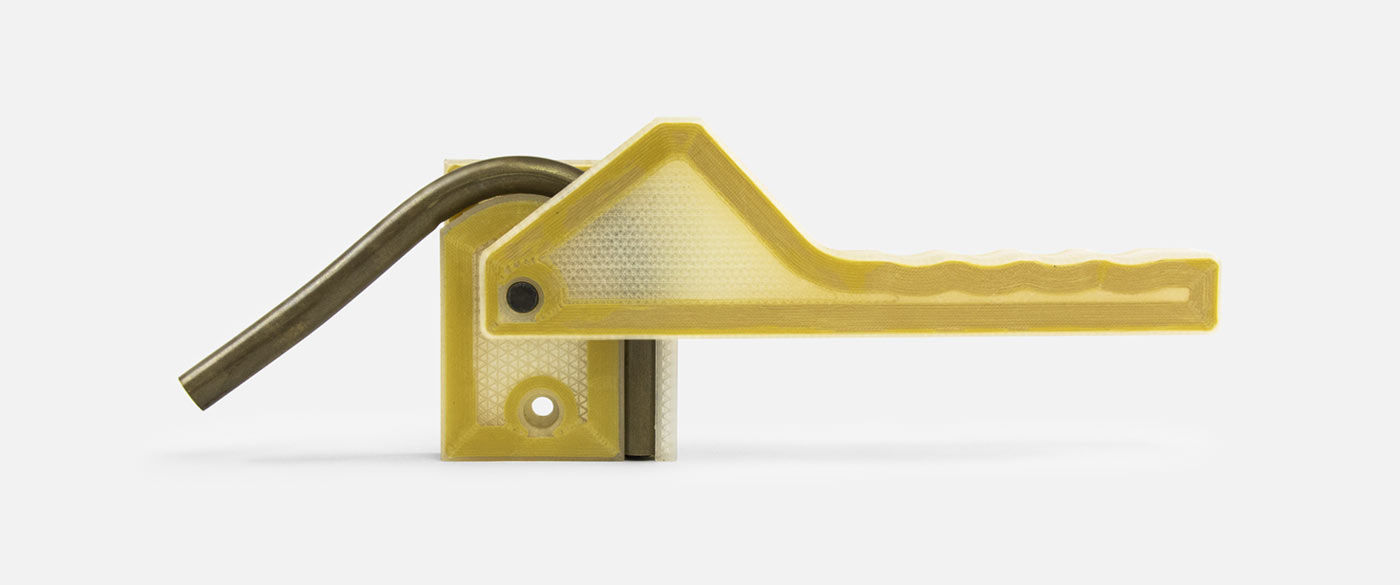 Reduce scrap rate and defects. The non-marring, low-friction shell provides an ideal contact surface, while the fiber reinforced core provides strength and precision to ensure quality.
Use your CNC design assets
Redesign for 3D printing far less. Printed composite parts can often directly replace aluminum machined parts.
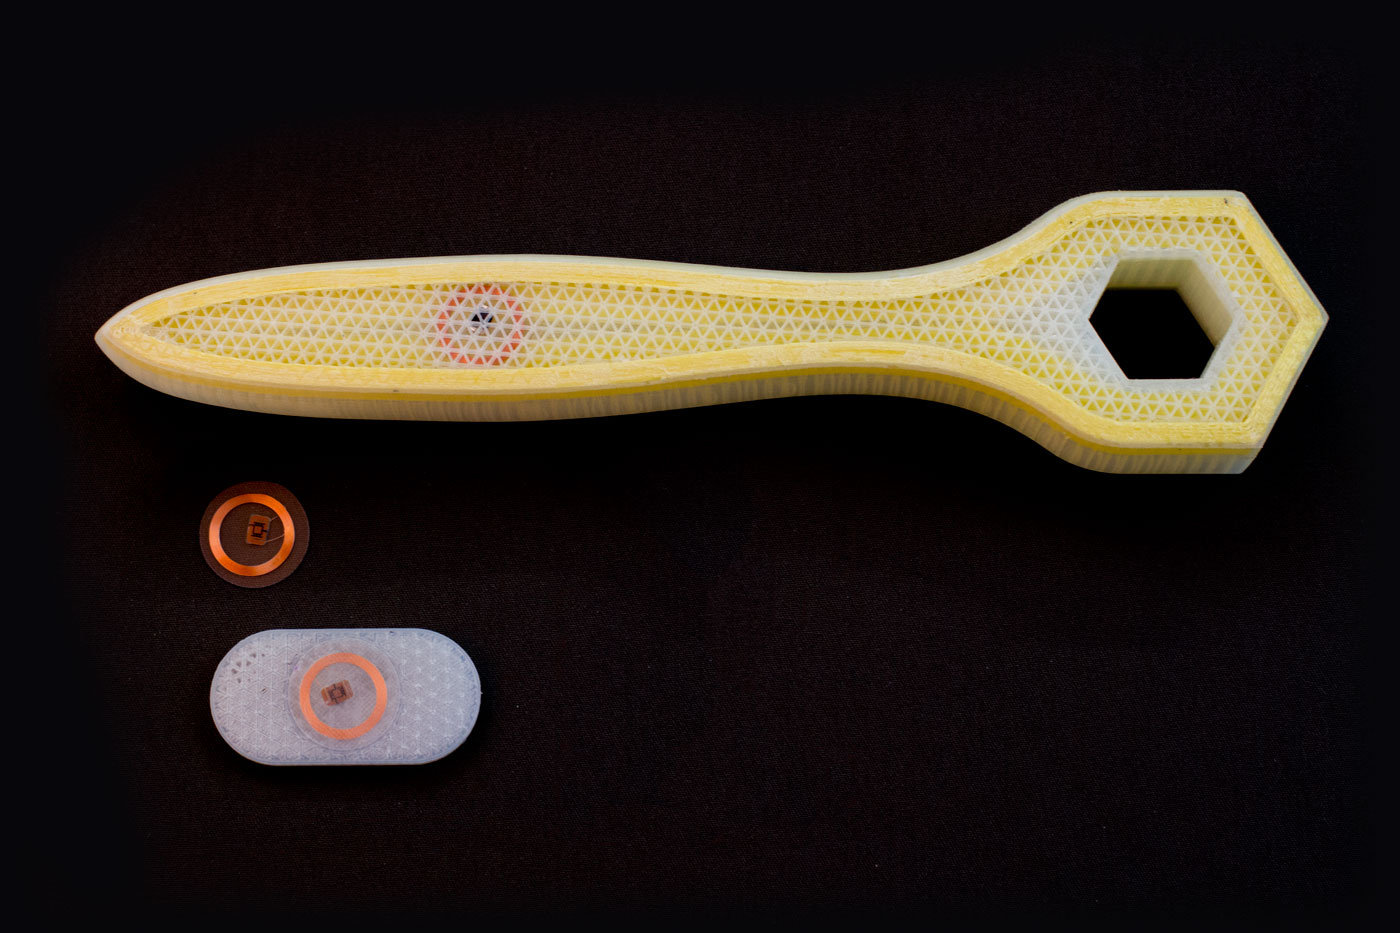
Embedded Electronics
Mistakes happen. And they cost a lot. Embedded RFID tags help ensure that all the tools in your workcell are at the current rev. Iterate quickly with total control of your assembly line.